DIY Snowy Christmas Tree Ornaments

I decided to also include a cute ornament to the packaging to add that special handmade touch. I found similar already pre-made ornaments at the craft store for almost $10 but decided to make my own for way cheaper! All you need to make your own snowy Christmas tree ornaments are:
-Clear Plastic ornaments (with removable tops)
-Fake craft snow/ glitter
–Small decorative Christmas trees
–Hot glue gun
–Long tweezers
–Wire cutters
–Scissors
–Jute Twine or ribbon
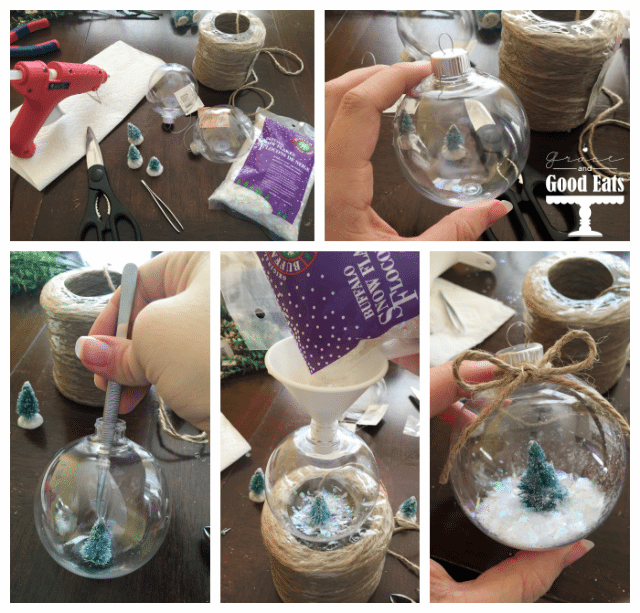
Take the tops off of the plastic ornaments and set aside. Use wire cutters to cut the base of the trees off if necessary (mine wouldn’t fit inside the ornaments with the base attached.) If you do cut off the base, make sure to add a small touch of hot glue to seal the bottom and keep the tree from losing branches or unraveling.
Add a ½ pea size amount of hot glue to the bottom of the tree and carefully stick it through the opening of the ornament, careful not to get it on the sides. Use long tweezers to hold the tree in place inside the ornament until the hot glue dries.
Fill the base of the ornament with fake snow (I used a small funnel to make it easier to fill). Place the top of the ornament back on to close and tie with ribbon or twine.


I love your ornament and it is featured on my blog at http://csc.mycreativehome.org/2015/12/idea-box-link-party-39.html#more.
Thank you for sharing!
These little ornaments are simply adorable! I’d love if you’d share this (or any of your favourite projects) at our link party, Create • Share • Inspire. Link up every Thursday at 8:00 pm EST at http://www.aburstofbeautiful.com.
Alicia xo
I’ve seen several glass snowy Christmas tree ornaments on Pinterest these days, but I’ve got to say that yours have got to be my favorite! Pinning to share.
Aww, thank you Marie!
I’m pinning this adorable ornament onto our DIY Sunday Showcase Party Talent Board!